Testing Car Battery’S Resistance With Load Tester
If you’re wondering how to test a car battery’s internal resistance with a battery load tester, you’ve come to the right place. Understanding the internal resistance of your car battery can provide vital information on its overall health and performance. By incorporating a battery load tester into your testing routine, you can accurately measure the internal resistance and ensure your battery is functioning optimally. In this article, we’ll take you through the step-by-step process of testing your car battery’s internal resistance with a battery load tester, so you can stay informed and keep your vehicle running smoothly. So, let’s dive in and explore how to test a car battery’s internal resistance with a battery load tester.

How to Test a Car Battery’s Internal Resistance with a Battery Load Tester?
Testing a car battery’s internal resistance is crucial to determine its overall health and performance. One effective method for performing this test is by using a battery load tester. This device applies a controlled load to the battery and measures its voltage response, enabling you to assess the internal resistance accurately. In this article, we will walk you through the step-by-step process of testing a car battery’s internal resistance with a battery load tester.
Section 1: Understanding Internal Resistance
Before we dive into the testing process, let’s first understand what internal resistance in a car battery means. Internal resistance refers to the opposition to the flow of electric current within a battery. It can be caused by factors such as the battery’s chemistry, temperature, and age.
What Does Internal Resistance Impact?
The internal resistance of a car battery affects its overall performance in several ways:
- Reduced voltage output: Higher internal resistance can lead to a drop in the battery’s voltage output, resulting in sluggish starts and poor electrical system performance.
- Increased heat generation: When a battery has high internal resistance, it tends to generate more heat during charging and discharging cycles, potentially shortening its lifespan.
- Reduced capacity: Batteries with elevated internal resistance may experience a decrease in their overall capacity, leading to shorter operating times.
- Diminished charge acceptance: High internal resistance makes it harder for the battery to accept a charge efficiently, resulting in longer charging times.
Section 2: Gathering the Necessary Tools
Before you can test a car battery’s internal resistance, it’s essential to gather the right tools for the job. Here’s a list of items you’ll need:
- A battery load tester: Choose a reliable battery load tester capable of measuring both internal resistance and voltage.
- A digital multimeter (DMM): This tool will help you measure the battery’s voltage accurately.
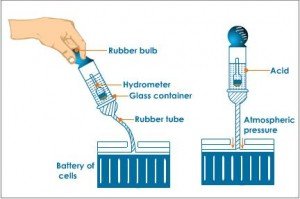
- A hydrometer (optional): If you have a traditional lead-acid battery, a hydrometer can provide additional insights into its state of charge.
- Safety equipment: Don’t forget to wear safety goggles and gloves to protect yourself from any potential accidents.
Section 3: Preparing for the Test
Now that you have the necessary tools, it’s time to prepare for the battery internal resistance test. Follow these steps to ensure a safe and accurate testing process:
Step 1: Safety First
Before handling any battery-related tasks, always prioritize safety. Make sure you’re wearing appropriate safety gear, such as goggles and gloves, to protect yourself from acid spills or electrical shocks.
Step 2: Vehicle Preparation
To ensure accurate results, it’s important to prepare the vehicle:
- Park the vehicle in a well-ventilated area away from flammable materials.
- Turn off the engine, headlights, and any other electrical systems that might draw power from the battery.
- Engage the parking brake to prevent the vehicle from rolling during testing.
- Open the hood and secure it properly to provide easy access to the battery.
Section 4: Conducting the Internal Resistance Test
With the necessary preparations complete, it’s time to proceed with the actual internal resistance test. Follow these steps carefully using your battery load tester:
Step 1: Connect the Load Tester
- Ensure that the load tester is turned off before connecting it to the battery.
- Connect the positive (red) clamp of the load tester to the positive terminal of the battery.
- Connect the negative (black) clamp of the load tester to the negative terminal of the battery.
Step 2: Set the Load Testing Parameters
- Consult the load tester’s manual to determine the appropriate load testing parameters.
- Set the load tester to the specified voltage and resistance settings suitable for your battery.
Step 3: Apply the Load
- Turn on the load tester and allow it to apply a controlled load to the battery.
- Observe the load tester’s display to record the voltage reading.
Step 4: Interpret the Results
- Compare the load tester’s voltage reading to the battery’s nominal voltage rating. A significant drop in voltage during the load test indicates higher internal resistance.
- Refer to the load tester’s manual or manufacturer’s guidance to interpret the results accurately.
Section 5: Interpreting the Results
Understanding the test results is crucial for making informed decisions about your car battery. Here are some possible outcomes and their interpretations:
Result 1: Voltage Drop Within Acceptable Range
If the load test results in a voltage drop within an acceptable range (usually up to 10%), it suggests that the battery has a healthy internal resistance level.
Result 2: Significant Voltage Drop
A significant voltage drop (above 10%) during the load test indicates higher internal resistance. This suggests that the battery may be nearing the end of its lifespan or experiencing other issues.
Result 3: Voltage Drop Below Acceptable Range
If the voltage drop is below the acceptable range (below 10%), it suggests that the battery may have internal short circuits or other severe problems. In such cases, it is recommended to replace the battery.
Section 6: Additional Considerations
Here are a few additional points to consider when testing a car battery’s internal resistance:
Regular Testing
Performing regular internal resistance tests, especially if you suspect battery issues or before embarking on long journeys, can help you catch potential problems early on.
Consulting Expert Advice
If you’re unsure about interpreting the test results or suspect underlying battery issues, it’s always advisable to consult with a professional mechanic or battery specialist.
Section 7: Conclusion
Testing a car battery’s internal resistance using a battery load tester is an effective way to assess its health and performance. By following the steps outlined in this guide, you can gain valuable insights into your battery’s internal condition and make informed decisions about its maintenance or replacement. Remember to prioritize safety and consult professional guidance if needed.
Frequently Asked Questions
Coming soon.
Frequently Asked Questions
How do I test a car battery’s internal resistance with a battery load tester?
To test a car battery’s internal resistance using a battery load tester, follow these steps:
What is a battery load tester?
A battery load tester is a device used to assess the health of a car battery by applying a load and measuring its performance under stress.
Why is it important to test a car battery’s internal resistance?
Testing a car battery’s internal resistance helps determine the battery’s overall health and its ability to deliver power to the vehicle’s electronic systems.
Can I test a car battery’s internal resistance without a battery load tester?
No, a battery load tester is specifically designed to measure internal resistance accurately. Alternative methods may not provide reliable results.
How should I interpret the results of a battery load tester?
A higher internal resistance reading indicates the battery may have deteriorated or is nearing the end of its useful life. A low reading suggests a healthy battery.
What actions should I take if the battery load tester indicates a high internal resistance?
If the internal resistance reading is high, it is advisable to have the battery inspected by a professional and consider replacing it if necessary.
How often should I test a car battery’s internal resistance?
It is recommended to test a car battery’s internal resistance periodically, especially before long trips or during routine maintenance, to ensure its reliability.
Final Thoughts
Testing a car battery’s internal resistance with a battery load tester is a simple yet crucial step in maintaining the health of your vehicle’s electrical system. By evaluating the internal resistance, you can detect potential issues with the battery and take appropriate action. With the help of a load tester, you can accurately measure the resistance and determine if the battery needs to be replaced. Regularly performing this test can prevent unexpected breakdowns and save you from costly repairs. So, next time you suspect battery-related problems, remember to test a car battery’s internal resistance with a reliable battery load tester.