Testing A Car Battery With A Hydrometer: A Step-By-Step Guide
Today we discuss Car Battery With A Hydrometer. Testing a car battery with a hydrometer is a simple yet essential task that every car owner should know. Wondering how to test a car battery with a hydrometer? Well, you’re in the right place! In this article, we’ll guide you through the process, step by step, so you can ensure the health and performance of your car battery. Let’s dive right in and demystify the world of car battery testing with a hydrometer. Trust us, it’s easier than you think!

How to Test a Car Battery with a Hydrometer?
Testing a car battery regularly is essential to ensure its health and performance. One of the most effective methods to test a car battery is by using a hydrometer. A hydrometer is a simple and inexpensive tool that measures the specific gravity of the battery’s electrolyte. By analyzing the specific gravity, you can determine the state of charge and overall condition of the battery. In this guide, we will walk you through the step-by-step process of testing a car battery with a hydrometer.
Understanding Car Battery Basics:
Before we dive into the testing process, it’s crucial to understand the basics of a car battery. This section will provide an overview of car battery components and the science behind their operation.
Car batteries are rechargeable electrochemical devices that store and deliver electrical energy. They consist of a plastic casing housing lead plates immersed in an electrolyte solution typically composed of sulfuric acid and water. When a chemical reaction occurs between the lead plates and the electrolyte, electricity is produced. This electricity powers various electrical components in the vehicle, such as the starter motor and lights.
1.1 Car Battery Components
To better understand the testing process, let’s briefly explore the main components of a car battery:
- Plastic Casing: The outer container that houses the internal components and protects them from damage.
- Positive and Negative Terminals: The connection points where electrical cables attach to the battery.
- Lead Plates: Thin, rectangular plates made of a lead alloy. They are the primary sites for chemical reactions that generate electrical energy.
- Electrolyte: A mixture of sulfuric acid and water that facilitates the chemical reactions between the lead plates.
1.2 Understanding Specific Gravity
Specific gravity refers to the density of a liquid compared to the density of water at a specific temperature. In the context of a car battery, it represents the concentration of the electrolyte solution. The specific gravity of the electrolyte changes with the state of charge and the battery’s overall health. By measuring the specific gravity, you can assess the battery’s condition and whether it requires charging or replacement.
A hydrometer measures the specific gravity by extracting a small amount of electrolyte from each battery cell and analyzing its density. It provides a reading on a scale indicating the state of charge, with higher values representing higher charge levels. This information helps determine if a battery is fully charged, undercharged, or suffering from internal damage.
Tools Required:
Before we move on to the testing process, make sure you have the necessary tools for the job. Testing a car battery with a hydrometer requires the following items:
- Hydrometer: A specialized tool designed to measure the specific gravity of a battery’s electrolyte.
- Safety Equipment: Safety glasses and gloves to protect yourself from accidental exposure to battery acid.
- Distilled Water: Used to restore the electrolyte levels if necessary.
- Towel or Rag: To clean any spills or drips during the testing process.
Step-by-Step Guide to Testing a Car Battery
Now that we have a good understanding of car batteries and the tools required, let’s dive into the step-by-step process of testing a car battery with a hydrometer.
3.1 Safety Precautions
Before starting, it is crucial to take the necessary safety precautions. Car batteries contain sulfuric acid, which is corrosive and can cause harm if mishandled. Follow these safety guidelines:
- Wear protective gloves and safety glasses to minimize the risk of acid exposure.
- Work in a well-ventilated area to avoid inhaling potentially harmful fumes.
- Avoid smoking or open flames near the battery, as sulfuric acid is highly flammable.
- Keep children and pets away from the testing area.
3.2 Accessing the Battery
To begin the testing process, you need to locate and access your car’s battery. Follow these steps:
- Open the car’s hood and secure it in place with the prop rod or hood latch.
- Identify the location of the battery within the engine compartment. It is typically positioned near the front of the vehicle.
- Ensure the engine is off and any electrical devices are turned off.
3.3 Removing Battery Vent Caps (If Applicable)
Some car batteries come with vent caps covering the battery cells. These caps protect against electrolyte evaporation and help maintain safe operating conditions. If your battery has vent caps, follow these steps to remove them:
- Inspect the top of the battery for any vent caps covering the individual cells. They are usually small plastic caps.
- Using a small flathead screwdriver or a designated cap removal tool, carefully pry off the vent caps.
- Set the vent caps aside in a safe place to avoid misplacing them during the testing process.
3.4 Checking Battery Voltage (Optional)
Before conducting the hydrometer test, you may also want to check the battery voltage using a multimeter. This step is optional but provides additional information about the battery’s health.
- Set your multimeter to DC voltage mode.
- Connect the positive (red) lead to the positive battery terminal and the negative (black) lead to the negative terminal.
- Read the voltage displayed on the multimeter screen.
- A fully charged battery should display a voltage between 12.4V and 12.7V.
3.5 Testing Each Battery Cell
Now, it’s time to perform the actual hydrometer test on each battery cell. The number of cells depends on the battery’s size, with most car batteries having six cells. Follow these steps:
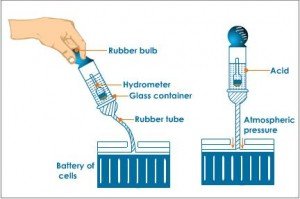
- Take the hydrometer and remove the rubber cap covering the nozzle.
- Insert the nozzle into the first battery cell, making sure it is submerged in the electrolyte solution.
- Squeeze the bulb at the top of the hydrometer to draw a small amount of electrolyte into the chamber.
- Hold the hydrometer level and wait for the float inside to settle.
- Read the specific gravity value indicated by the float, typically displayed on a scale.
- Repeat the process for each of the remaining battery cells.
3.6 Interpreting the Hydrometer Readings
The specific gravity readings obtained from each battery cell can provide valuable insights into the battery’s condition. Here’s how to interpret the readings:
- Specific Gravity Range: A fully charged battery typically has a specific gravity reading between 1.265 and 1.280.
- Equal Readings: If all battery cells display similar specific gravity values within an acceptable range, the battery is likely in good condition.
- Unequal Readings: Significant variations in specific gravity readings between cells may indicate an imbalance or damaged cell.
- Low Readings: If the specific gravity readings are consistently low across all cells, the battery may require charging or replacement.
3.7 Restoring Electrolyte Levels (If Necessary)
During the hydrometer test, you may discover that the electrolyte levels are low in certain battery cells. In such cases, you should restore the levels using distilled water. Follow these steps:
- Carefully remove the vent caps from the affected battery cells (if applicable).
- Using a funnel or a specialized battery filler, add distilled water to each cell until the electrolyte covers the lead plates.
- Avoid overfilling the cells, as it can lead to electrolyte overflow during battery operation.
- Replace the vent caps securely once the electrolyte levels are restored.
3.8 Recharging or Replacing the Battery (If Required)
Based on the hydrometer readings and overall battery condition, you may need to take further action. Here are some guidelines:
- Fully Charged Battery: If the specific gravity readings indicate a fully charged battery, it means the battery is in good condition.
- Undercharged Battery: Low specific gravity readings across all cells suggest an undercharged battery. Recharge the battery using an appropriate charger.
- Imbalanced Cells: Significant variations in specific gravity readings between cells may indicate a damaged cell. In such cases, it’s best to replace the battery.
- Consistently Low Readings: If the specific gravity readings are consistently low across all cells, the battery is likely old or damaged, requiring replacement.
How to check a Car Battery with a Hydrometer
Frequently Asked Questions
How do I test a car battery with a hydrometer?
In order to test a car battery using a hydrometer, you will need to follow these steps:
What is a hydrometer and how does it work?
A hydrometer is a tool used to measure the specific gravity of the battery’s electrolyte. It works by drawing in a small amount of electrolyte and measuring its density to determine the state of charge of the battery.
What are the materials required to test a car battery with a hydrometer?
To test a car battery with a hydrometer, you will need a hydrometer, a pair of safety goggles, rubber gloves, distilled water, a rag, and a battery terminal cleaner.
What are the steps to prepare the battery before using a hydrometer?
Prior to using a hydrometer, you must first ensure the battery is fully charged and the engine is turned off. You should then remove any corroded terminal connections, clean them with a battery terminal cleaner, and wipe off any dirt or debris from the battery’s top surface.
How do I use a hydrometer to test a car battery?
To use a hydrometer, insert the tip into the battery cell and draw some of the electrolyte into the hydrometer. Then, observe the reading on the hydrometer’s scale. Repeat this process for each cell in the battery.
What do the readings on the hydrometer mean?
The readings on the hydrometer’s scale indicate the specific gravity of the battery’s electrolyte. It provides information about the state of charge of the battery. A reading of 1.265 to 1.299 indicates a fully charged battery, while a reading below 1.225 suggests the battery needs to be recharged or replaced.
When should I test my car battery with a hydrometer?
You should test your car battery with a hydrometer if you are experiencing issues with starting the vehicle or if the battery is over three years old. Regularly checking the battery’s state of charge can help detect potential problems before they become more serious.
Final Thoughts
testing a car battery with a hydrometer is a simple and effective method to determine its health and charge level. By measuring the specific gravity of the electrolyte solution, users can assess the battery’s state of charge and detect potential issues. This process involves collecting a sample of the electrolyte, placing it in the hydrometer, and comparing the readings to a reference chart. Regularly testing a car battery with a hydrometer can help identify if it needs charging, maintenance, or replacement, ensuring optimal performance and preventing unexpected breakdowns. So, next time you suspect battery problems, remember to test your car battery with a hydrometer.