how to ground a car radio antenna?
Are you tired of dealing with poor reception on your car radio? There’s a simple solution that can vastly improve the quality of your audio experience – grounding your car radio antenna. While it may sound like a daunting task, fear not! In this guide, we will walk you through the step-by-step process of grounding your car radio antenna, ensuring optimal reception and crystal-clear sound for your daily commute or road trips. A properly grounded car radio antenna is crucial for receiving strong and clear radio signals. Without a solid ground connection, your antenna can pick up unwanted interference, resulting in static, weak signals, and frustrating audio interruptions. By following our expert advice and utilizing a few basic tools, you’ll be well on your way to enjoying your favorite tunes or staying informed with news and weather updates, all without the annoyance of static-filled broadcasts. So, grab your tools, roll up your sleeves, and let’s dive into the world of grounding a car radio antenna!
How to Ground a Car Radio Antenna:
- Locate a suitable grounding point on the vehicle, such as a metal bolt or screw.
- Use a wire stripper to remove a small section of insulation from the antenna’s grounding wire.
- Attach the exposed grounding wire to the chosen grounding point using a ring terminal or a grounding screw.
- Ensure a secure connection by tightening the grounding screw or bolt.
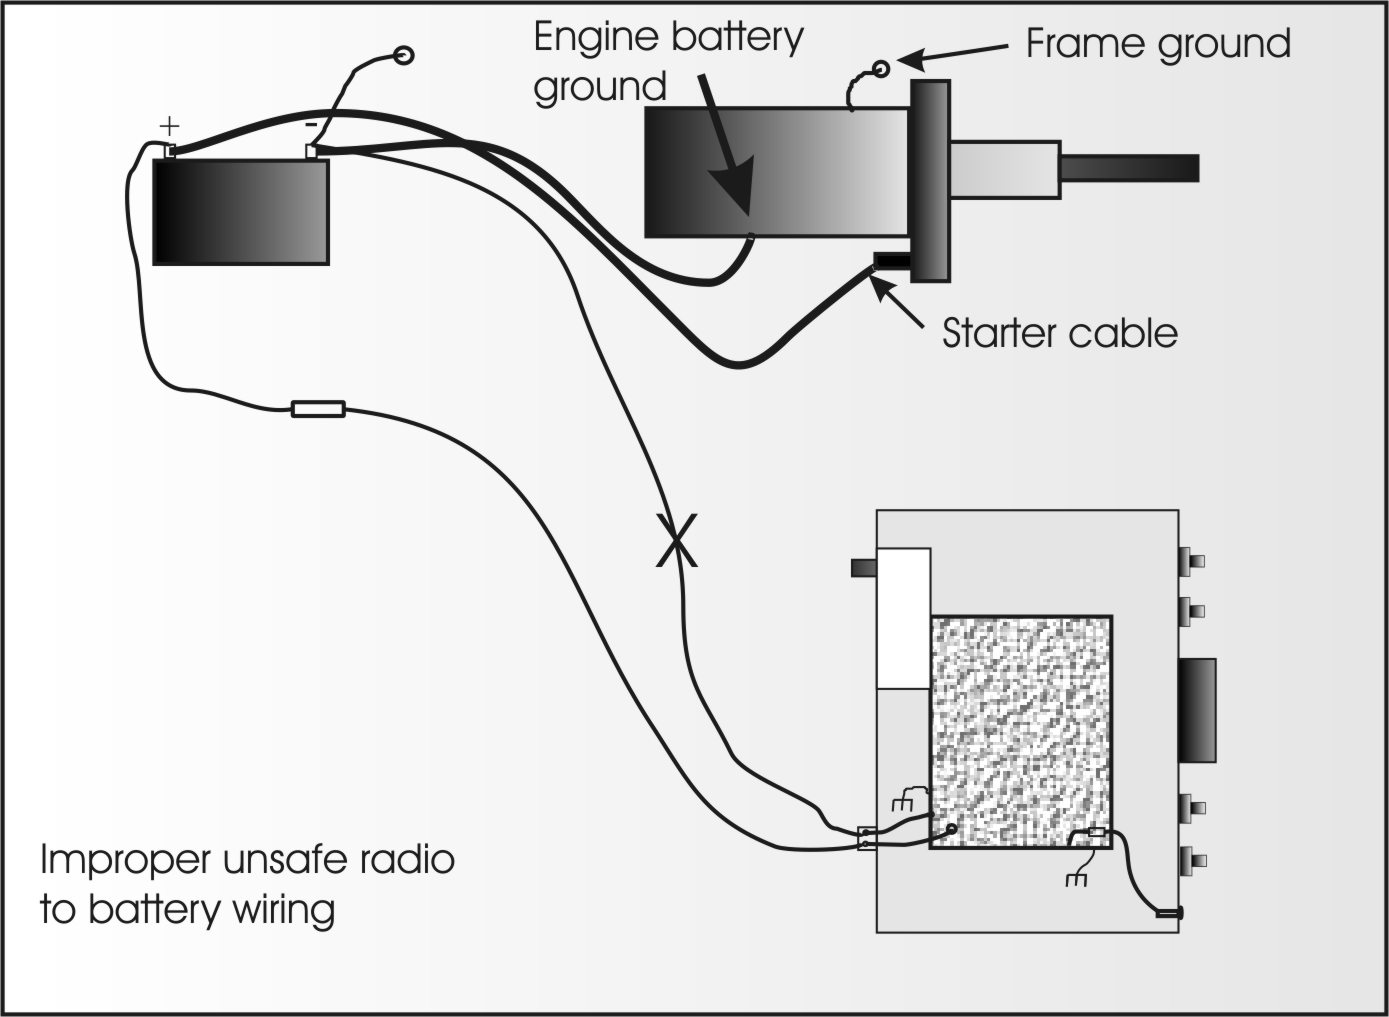
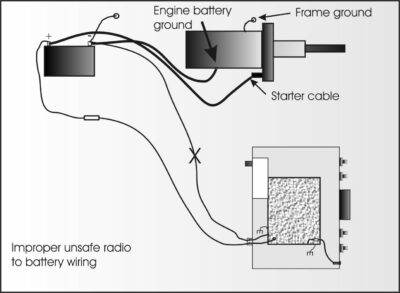
Source: w8ji.com
How to Ground a Car Radio Antenna?
Grounding a car radio antenna is an important step in ensuring optimal performance and reducing interference. By properly grounding the antenna, you can enhance signal reception and minimize static and noise. In this step-by-step guide, we will walk you through the process of grounding a car radio antenna to help you achieve the best audio quality in your vehicle.
Step 1: Choose the Grounding Location
The first step in grounding a car radio antenna is to select an appropriate location for grounding. Look for a metal surface on your vehicle’s chassis, preferably close to where the antenna is mounted. The chosen spot should be clean and free from any rust, paint, or other coatings that may hinder proper grounding. It is important to note that the grounding location should be as close to the antenna mount as possible to minimize signal loss.
Step 2: Prepare the Grounding Surface
Once you have identified the grounding location, you need to prepare the surface for grounding. Start by using sandpaper or a wire brush to remove any paint or rust from the chosen spot. This will ensure a clean and conductive surface for proper grounding. After removing the paint or rust, wipe the area with a clean cloth to remove any debris or dust.
Step 3: Attach the Grounding Wire
Now it’s time to attach the grounding wire to the chosen grounding location. Cut a length of wire that is sufficient to reach from the antenna mount to the grounding spot. Strip off about half an inch of insulation from each end of the wire. Secure one end of the wire to the grounding spot using a screw or bolt, ensuring a tight connection. If necessary, you may need to drill a small hole to accommodate the wire. Once the wire is securely attached, route it towards the antenna mount.
Step 4: Connect the Grounding Wire to the Antenna Mount
At the antenna mount, locate the grounding connection point. This is usually a screw terminal or a metal tab specifically designed for grounding purposes. Connect the other end of the grounding wire to this terminal or tab, making sure it is tightly secured. If needed, you can use a small wrench or pliers to ensure a firm connection. Once the grounding wire is properly attached to the antenna mount, check the connection for any looseness or movement.
Step 5: Test the Grounding
After completing the grounding process, it is essential to test the effectiveness of the connection. Turn on your car radio and tune it to a station with weak reception. Observe if there is any improvement in the signal quality and reduction in static or noise. If the grounding is successful, you should notice a significant enhancement in the audio clarity. If not, double-check all the connections and ensure they are tight and secure.
Step 6: Secure and Insulate the Grounding Wire
Once you have verified that the grounding is working correctly, it is crucial to secure and insulate the grounding wire. Use zip ties or electrical tape to secure the wire and prevent it from dangling or coming into contact with other components. Ensure that the wire is not pinched or twisted, as this can affect its performance. Additionally, cover any exposed metal parts of the wire with electrical tape to protect against corrosion and ensure longevity.
Step 7: Regularly Inspect and Maintain the Grounding
Grounding is not a one-time task; it requires regular inspection and maintenance to ensure optimal performance. Periodically check the grounding wire and connections for any signs of corrosion, damage, or looseness. Clean the grounding spot and wire if necessary, using a wire brush or sandpaper. By implementing routine maintenance, you can ensure that the grounding remains effective and your car radio antenna performs at its best.
Frequently Asked Questions
Here are some common questions about how to ground a car radio antenna:
Q: Why is grounding a car radio antenna important?
Grounding a car radio antenna is important because it helps to improve the performance and reception of the radio. When the antenna is properly grounded, it helps to eliminate interference and static, resulting in a clearer and stronger signal. Additionally, grounding the antenna also helps to protect the radio and other electrical components from damage caused by electrical surges or lightning strikes.
Overall, grounding the car radio antenna is essential for optimal radio performance and protection of the vehicle’s electrical system.
Q: How do I know if my car radio antenna is properly grounded?
To determine if your car radio antenna is properly grounded, you can perform a visual inspection. Start by checking the antenna connection to ensure it is securely attached to the vehicle. Look for any signs of corrosion or damage that may affect the grounding. Additionally, you can use a multimeter to test the continuity between the antenna and the vehicle’s chassis. If there is a good connection and low resistance, it indicates that the antenna is properly grounded.
If you are uncertain about the grounding of your car radio antenna, it is recommended to consult a professional or refer to the manufacturer’s instructions for specific guidance.
Q: Can I ground my car radio antenna to any metal part of the vehicle?
No, it is important to ground the car radio antenna to a suitable metal part of the vehicle. The optimal grounding point is typically the vehicle’s chassis. The chassis acts as a natural ground and helps to dissipate any electrical charges that may affect the antenna’s performance. It is important to avoid grounding the antenna to plastic or non-metallic parts, as they do not provide a proper grounding connection.
When selecting a grounding point, ensure that it is clean and free from any paint, rust, or other debris that may hinder the grounding connection. It is also recommended to use a grounding strap or wire that is specifically designed for car audio installations to ensure a secure and reliable connection.
Q: Can I ground multiple car radio antennas to the same point?
Yes, it is possible to ground multiple car radio antennas to the same grounding point. However, it is important to ensure that the grounding point can handle the combined current and voltage requirements of all the antennas. Using a grounding block or distribution block can help to consolidate the grounding connections and provide a secure and efficient grounding solution for multiple antennas.
When grounding multiple antennas, it is crucial to maintain proper separation between the antennas to minimize interference and signal loss. It is recommended to follow the manufacturer’s guidelines and consult a professional for specific instructions on grounding multiple car radio antennas.
Q: What should I do if I am experiencing poor reception or interference after grounding my car radio antenna?
If you are experiencing poor reception or interference after grounding your car radio antenna, there are a few troubleshooting steps you can take. First, ensure that the antenna connection is secure and that the grounding wire is properly attached to the vehicle’s chassis. Check for any signs of damage or corrosion that may affect the grounding connection.
If the grounding is intact, you can try repositioning the antenna to different locations on the vehicle to find the optimal reception. Avoid placing the antenna near any sources of interference, such as power lines, large metal objects, or electronic devices. Additionally, you can consider using an antenna amplifier or signal booster to enhance the radio reception.
If the issue persists, it is recommended to consult a professional for further assistance in diagnosing and resolving the reception or interference problems.
In conclusion, ensuring a properly grounded car radio antenna is crucial for optimal performance and longevity. By following the steps outlined in this guide, you can confidently tackle this task and enjoy uninterrupted, high-quality audio experience on your drives. Remember to carefully select the ideal grounding point, secure the grounding wire tightly, and periodically check for any signs of corrosion or damage. By doing so, you can ensure that your car radio antenna remains grounded, providing you with clear reception and enhancing your overall driving experience. Don’t let a poor grounding connection diminish your listening pleasure or cause unnecessary signal interference. Taking the time to properly ground your car radio antenna will not only improve the audio quality but also protect the components of your vehicle’s electrical system. So, get started today by following the steps outlined in this guide, and enjoy a hassle-free radio experience on your future journeys. Remember, a well-grounded car radio antenna is the key to unlocking the full potential of your car’s audio system.