how to add one more ohm at a car speaker
Are you tired of your car audio system lacking that extra punch and clarity? Do you find yourself yearning for a richer and more immersive audio experience during your daily commutes or road trips? If so, you’re in the right place. In this guide, we will explore the art of upgrading your car speaker’s impedance by adding one more ohm, unlocking a world of improved sound quality and enhanced audio performance. Whether you’re a seasoned car audio enthusiast or a beginner looking to elevate your driving experience, this step-by-step tutorial will provide you with the knowledge and skills needed to take your car audio system to new heights. Imagine cruising down the highway, feeling the bass reverberating through your chest and the crisp highs filling the cabin with crystal-clear melodies. With just a simple modification to your car speaker’s impedance, you can achieve this audio nirvana. In this comprehensive guide, we will delve into the fundamentals of impedance, explore the benefits of adding one more ohm to your car speaker, and provide you with practical tips and techniques to accomplish this upgrade with ease. So, buckle up and get ready to embark on a journey that will revolutionize your in-car audio experience. Let’s dive in and unlock the full potential of your car’s sound system.
How to Add One More Ohm at a Car Speaker:
- Disconnect the car speaker from the amplifier or receiver.
- Identify the speaker’s impedance, measured in ohms.
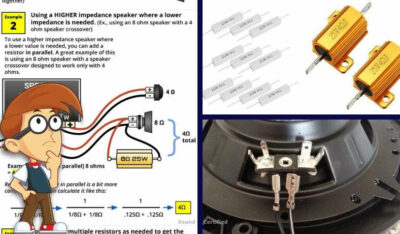
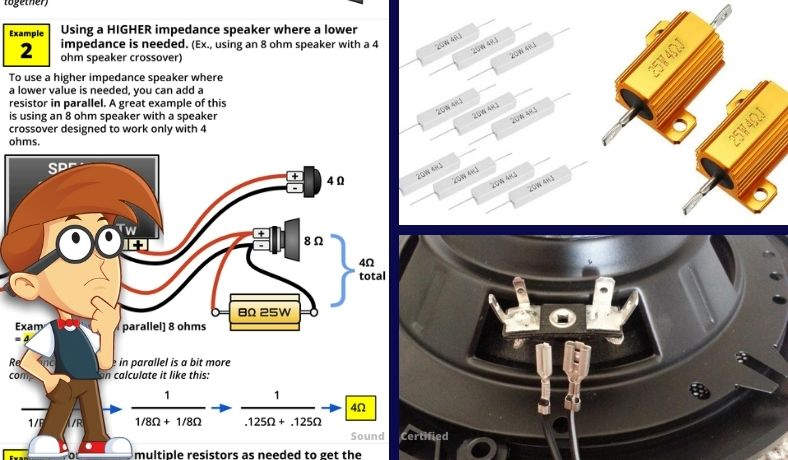
- If the speaker has a lower impedance than desired, connect a resistor in series with the speaker to increase the total impedance.
- Calculate the required resistance using Ohm’s Law (R = V/I), where R is the resistance, V is the voltage, and I is the current.
- Select a resistor with the calculated resistance value and connect it in series with the speaker.
- Reconnect the speaker to the amplifier or receiver.
Source: soundcertified.com
How to Add One More Ohm at a Car Speaker
In order to enhance the audio quality in your car, you may want to consider adding one more ohm at your car speaker. This can help improve the overall sound output and give you a more enjoyable listening experience. However, it is important to follow the correct steps and ensure that you have the necessary tools and equipment before attempting this modification. This guide will provide you with a step-by-step process on how to add one more ohm at a car speaker.
Step 1: Gather the Required Materials
Before you begin, make sure you have all the necessary materials and tools. You will need a multimeter, a soldering iron, solder wire, heat shrink tubing, a wire cutter/stripper, and additional speaker wire. It is also recommended to have a small screwdriver set and electrical tape on hand.
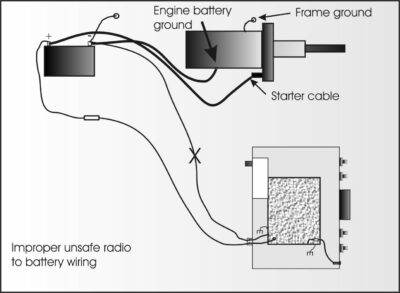
Step 2: Disconnect the Car Battery
Prior to working on any electrical components in your car, it is crucial to disconnect the car battery. This will prevent any accidental short circuits or damage to the electrical system. Locate the car battery and use a wrench to loosen and remove the negative terminal connection.
Step 3: Identify the Speaker’s Impedance
Before adding one more ohm at your car speaker, you need to determine the current impedance of the speaker. This information is usually specified in the speaker’s user manual or can be found online. It is important to ensure that the additional ohm you will be adding matches the impedance of the existing speaker to avoid any compatibility issues.
Step 4: Remove the Speaker
Next, you will need to remove the speaker from its mounting location. This can typically be done by removing any screws or clips that secure the speaker in place. Carefully disconnect the speaker wires from the car’s audio system, taking note of which wire corresponds to the positive and negative terminals.
Step 5: Add the Additional Ohm
Once the speaker is removed, you can proceed to add the additional ohm. This is done by connecting the additional speaker wire in series with the existing speaker wire. Use the wire cutter/stripper to remove a small section of the insulation from both wires. Twist the exposed ends together, ensuring a secure connection, and solder them together. Cover the soldered joint with heat shrink tubing and use a heat gun to shrink it in place.
Step 6: Reinstall the Speaker
After adding the additional ohm, carefully reinstall the speaker back into its original mounting location. Secure it in place using the screws or clips that were previously removed. Reconnect the speaker wires to the car’s audio system, ensuring that the positive and negative terminals are correctly matched.
Step 7: Reconnect the Car Battery
With the speaker successfully installed, you can now reconnect the car battery. Use the wrench to reattach the negative terminal connection and tighten it securely. This will restore power to the car’s electrical system.
Step 8: Test the Sound Quality
Once everything is reconnected, turn on your car’s audio system and test the sound quality. You should notice an improvement in the audio output with the addition of one more ohm. Adjust the volume and settings as desired to achieve your preferred sound experience.
Step 9: Ensure Proper Functionality
After testing, make sure to check that all connections are secure and there are no loose wires. Ensure that the speaker is functioning properly and that there are no issues with the sound output. If any problems arise, double-check the connections and consult the speaker’s user manual or seek professional assistance.
Step 10: Enjoy the Enhanced Audio Experience
With one more ohm added to your car speaker, you can now enjoy a better audio experience while driving. Whether you’re listening to music or enjoying a podcast, the enhanced sound quality will make your time on the road more enjoyable.
Frequently Asked Questions
Here are some common questions about adding one more ohm to a car speaker:
Q: How can I add one more ohm to a car speaker?
To add one more ohm to a car speaker, you can use a resistor in series with the speaker. The resistor should have a resistance value equal to the difference between the desired total impedance and the current impedance of the speaker. For example, if the speaker has an impedance of 4 ohms and you want to increase it to 5 ohms, you would use a 1-ohm resistor in series with the speaker.
It is important to note that adding a resistor may affect the power handling capability of the speaker and potentially alter its frequency response. It is recommended to consult with a professional or refer to the speaker’s manual for guidance on modifying its impedance.
Q: Will adding one more ohm to a car speaker affect its sound quality?
Adding one more ohm to a car speaker can potentially impact its sound quality. The impedance of a speaker affects how it interacts with the amplifier and determines the electrical load it presents. Altering the impedance by adding a resistor may change the speaker’s frequency response, resulting in a different sound. It is important to consider the implications of modifying the impedance and to experiment cautiously to achieve the desired sound quality.
It is also worth noting that other factors, such as the quality of the speaker itself, the amplifier, and the overall audio system setup, can also influence the sound quality. It is recommended to carefully evaluate all components and their compatibility to ensure optimal performance.
Q: Can I add any value resistor to increase the speaker’s impedance?
While it is technically possible to add any value resistor to increase the speaker’s impedance, it is important to consider the implications and limitations. The value of the resistor should be chosen based on the desired increase in impedance and the current impedance of the speaker. Adding a resistor with too high or too low of a value may result in undesirable effects on the speaker’s performance.
Additionally, it is important to ensure that the added resistor can handle the power requirements of the speaker. Using a resistor with insufficient power handling capacity can lead to overheating and potential damage. It is recommended to consult with a professional or refer to the speaker’s manual for guidance on selecting the appropriate resistor value.
Q: Are there any risks involved in adding a resistor to a car speaker?
Adding a resistor to a car speaker carries some risks that should be considered. One potential risk is the impact on the power handling capability of the speaker. The added resistor can increase the total impedance, which may result in a lower power transfer from the amplifier to the speaker. This can potentially reduce the speaker’s maximum output level.
Another risk is the potential alteration of the speaker’s frequency response. Modifying the impedance can affect how the speaker reproduces different frequencies, potentially leading to an imbalance in the audio playback. It is important to carefully evaluate the implications and potential trade-offs before proceeding with adding a resistor to a car speaker.
Q: Should I consult a professional before adding a resistor to a car speaker?
Consulting a professional before adding a resistor to a car speaker is recommended, especially if you are not familiar with electrical circuits and audio systems. A professional can provide guidance on selecting the appropriate resistor value, considering factors such as the speaker’s impedance and power handling capability.
Moreover, a professional can also help assess the overall impact on the audio system and ensure that the modification aligns with your desired goals. They can provide expert advice on potential risks and help you make an informed decision. It is always better to seek professional assistance to avoid any potential damage to the car speaker or the audio system as a whole.
In conclusion, the process of adding one more ohm to a car speaker can greatly enhance your audio experience on the road. By following the steps outlined in this guide, you will be able to achieve a higher level of sound quality and clarity, while also ensuring the longevity of your car’s audio system. Remember, it is crucial to select the appropriate components, such as resistors and capacitors, and to carefully follow the wiring instructions provided. Additionally, taking your time and double-checking your connections will help to prevent any potential damage to your car’s electrical system. With patience and diligence, you can successfully add one more ohm to your car speaker, and enjoy an enhanced audio experience that will make your journeys even more enjoyable. So, go ahead and take the leap – your ears will thank you!