How to Test a Car Battery Internal Resistance with a Digital Analyzer?
How to Test a Car Battery Internal Resistance with a Digital Analyzer? Testing a car battery’s internal resistance is crucial for diagnosing its health and performance. So, how can you accurately determine the internal resistance of your car battery using a digital analyzer?
In this article, we will guide you step-by-step on how to perform this test effectively. By understanding the internal resistance of your battery, you can identify potential issues and take appropriate action to ensure optimal performance and prevent unexpected breakdowns. So, let’s dive in and learn how to test a car battery’s internal resistance with a digital analyzer!

How to Test a Car Battery’s Internal Resistance with a Digital Analyzer?
Testing a car battery’s internal resistance is crucial to ensure its overall health and performance. The internal resistance of a battery determines its ability to supply power to the vehicle’s electrical system. By using a digital analyzer, you can accurately measure the internal resistance and assess the battery’s condition. In this article, we will guide you through the process of testing a car battery’s internal resistance step by step.
Understanding Internal Resistance in Car Batteries
Before diving into the testing process, it’s essential to understand what internal resistance means in the context of car batteries. Internal resistance refers to the opposition or impedance encountered within the battery as it delivers electrical current. The higher the internal resistance, the lower the battery’s ability to supply power efficiently. Factors such as age, temperature, and usage can affect internal resistance.
The Impact of Internal Resistance on Car Batteries
Internal resistance plays a significant role in a car battery’s performance and overall lifespan. Here are some key impacts of high internal resistance:
- Reduced charging efficiency: High internal resistance can hinder the battery’s ability to accept a charge effectively, leading to longer charging times.
- Diminished cranking power: The resistance within the battery can limit the amount of power available for starting the engine. This may result in slow or failed engine cranking.
- Increased self-discharge: A battery with high internal resistance can lose its charge more quickly when not in use, leading to shorter overall battery life.
- Heat generation: High internal resistance generates excessive heat during the battery’s operation, potentially causing damage to the internal components.
Understanding these impacts emphasizes the importance of regularly testing a car battery’s internal resistance.
Section 2: Choosing the Right Digital Analyzer
To accurately measure a car battery’s internal resistance, you need a reliable digital analyzer. Here are some factors to consider when selecting a suitable device:
Accuracy and Precision
Look for a digital analyzer that offers precise and accurate measurements. A device with a small margin for error ensures that you obtain reliable readings for better assessment.
Compatibility
Ensure that the digital analyzer you choose is compatible with the battery types commonly used in cars. It should support lead-acid batteries, including flooded, gel, and AGM (Absorbent Glass Mat) varieties.
Features and Functionality
Consider additional features such as a built-in temperature sensor or data logging capabilities. These features can provide more comprehensive information about the battery’s health and performance.
Ease of Use
Opt for a digital analyzer that is user-friendly and intuitive. Clear instructions, a simple interface, and easy-to-understand readings make the testing process more efficient.
Preparing for the Test:
Before conducting the internal resistance test, it is essential to take a few preparatory steps. Follow these guidelines to ensure accurate results:
Safety Precautions
Always prioritize safety when working with car batteries. Wear appropriate protective gear, such as gloves and safety glasses, to prevent any potential accidents.
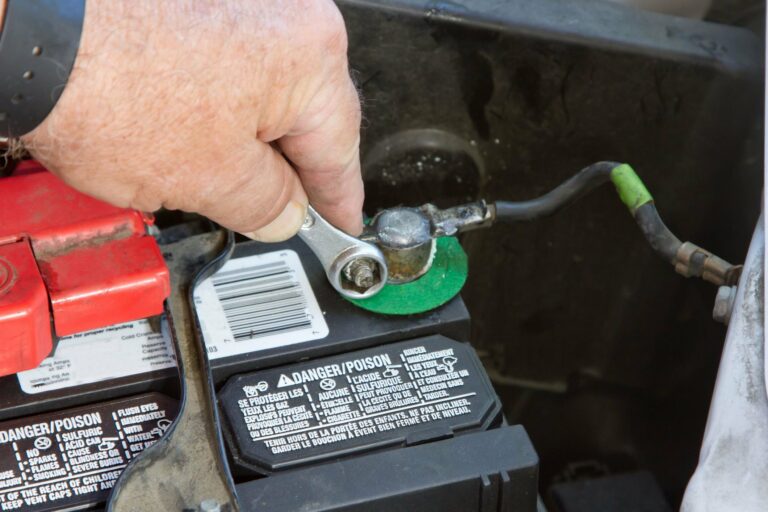
Disconnecting the Battery
To ensure accurate readings and avoid interference from other electrical systems, disconnect the battery from the vehicle. Start by removing the negative (-) terminal, followed by the positive (+) terminal.
Battery Resting Period
Allow the battery to rest and stabilize for at least one hour after disconnecting it. This resting period ensures that any surface charge is dissipated, providing more accurate readings.
Performing the Internal Resistance Test
Once the battery is prepared and ready, you can proceed with testing its internal resistance using a digital analyzer. Follow these steps for an accurate and reliable assessment:
Step 1: Setting Up the Digital Analyzer
Read and follow the manufacturer’s instructions to set up the digital analyzer properly. Ensure that it is connected securely and powered on.
Step 2: Selecting the Battery Type
Choose the appropriate battery type on the digital analyzer. Select between flooded, gel, or AGM batteries, depending on the battery installed in your vehicle.
Step 3: Temperature Compensation (if available)
If your digital analyzer has a temperature compensation feature, enter the ambient temperature or allow the device to read it automatically. Temperature compensation ensures accurate readings by accounting for temperature variations.
Step 4: Connecting the Analyzer to the Battery
Connect the digital analyzer to the battery terminals, ensuring a secure and proper connection. The positive (+) lead should connect to the battery’s positive terminal, and the negative (-) lead to the negative terminal.
Step 5: Initiating the Test
Start the internal resistance test on the digital analyzer according to the manufacturer’s instructions. The device will measure the resistance and provide the corresponding reading.
Step 6: Analyzing the Results
Once the test is complete, evaluate the readings displayed on the digital analyzer. Compare the obtained internal resistance value with the manufacturer’s specifications or industry standards. This comparison will help determine the battery’s health and its ability to deliver power efficiently.
Interpreting the Internal Resistance Readings
The internal resistance readings obtained from the digital analyzer can provide valuable insights into the battery’s condition. Here is a general guideline for interpreting the internal resistance readings:
Low Internal Resistance
If the internal resistance reading is exceptionally low, it may indicate a shorted cell within the battery. It is advisable to replace the battery as soon as possible, as a shorted cell can lead to further damage or reduced performance.
Normal Internal Resistance
If the internal resistance falls within the normal range specified by the battery manufacturer or industry standards, it indicates a healthy battery with good power delivery capabilities. However, closely monitor the battery’s performance and consider retesting periodically.
High Internal Resistance
A high internal resistance reading suggests that the battery’s overall health is deteriorating. It indicates increased opposition to current flow, leading to reduced power supply efficiency. In such cases, it may be time to consider replacing the battery to avoid unexpected failures.
Maintaining Your Car Battery’s Health
Regularly testing your car battery’s internal resistance is just one aspect of ensuring its longevity and optimal performance. Here are some additional tips for maintaining your car battery’s health:
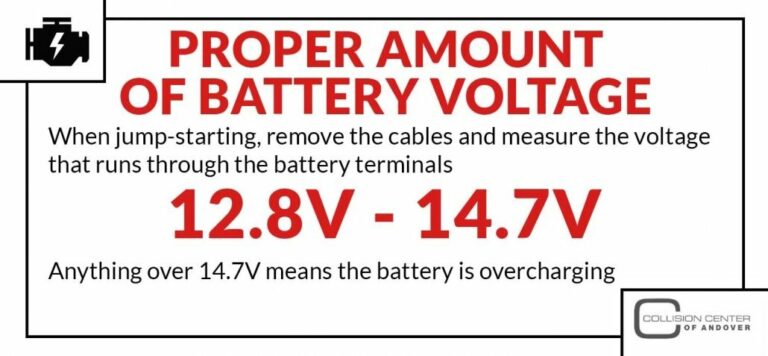
Charge the Battery Properly
Follow the manufacturer’s recommendations for charging your battery correctly. Overcharging or undercharging can significantly impact the battery’s internal components and overall lifespan.
Keep the Battery Clean
Maintain a clean battery by regularly inspecting and cleaning the terminals. Dirty or corroded terminals can impede the flow of electricity and lead to increased internal resistance.
Store the Battery Correctly
If you need to store your car battery for an extended period, ensure it is stored in a cool and dry location. Avoid areas with extreme temperatures or direct sunlight, as these conditions can accelerate battery degradation.
Monitor the Battery’s Age
Keep track of your battery’s age and consider replacing it as it reaches the end of its recommended lifespan. Older batteries are more likely to have higher internal resistance and reduced performance.
How to test a car battery
Frequently Asked Questions
How do I test a car battery’s internal resistance with a digital analyzer?
To test a car battery’s internal resistance using a digital analyzer, follow these steps:
What equipment do I need to test a car battery’s internal resistance?
To test a car battery’s internal resistance, you will need a digital analyzer specifically designed for battery testing. This analyzer typically comes with test leads and clamps to connect to the battery terminals.
How do I connect the digital analyzer to the car battery?
Start by turning off the vehicle and ensuring all electrical loads are off. Connect the red test lead to the positive terminal of the battery and the black test lead to the negative terminal. Make sure the connections are secure and free from any corrosion.
What settings should I use on the digital analyzer for testing?
Consult the user manual or instructions provided with the digital analyzer for specific settings. In general, you will need to select the internal resistance or impedance testing mode. Set the range and any other parameters as recommended by the manufacturer.
How long should I wait before recording the internal resistance reading?
After connecting the digital analyzer and selecting the appropriate settings, wait for a few seconds for the reading to stabilize. This allows the analyzer to take accurate measurements of the battery’s internal resistance.
What is a normal range for a car battery’s internal resistance?
The normal range for a car battery’s internal resistance can vary depending on the type of battery and its age. However, as a general guideline, an internal resistance below 30 milliohms is considered healthy for most car batteries.
What does a high internal resistance reading indicate?
A high internal resistance reading on a car battery indicates potential issues such as aging, sulfation, or a problem with the battery’s internal components. In such cases, it may be necessary to replace the battery to ensure optimal performance.
Final Thoughts
To conclude, testing a car battery’s internal resistance with a digital analyzer is a straightforward process that can provide valuable insights into the battery’s health. By connecting the analyzer to the battery terminals and following the manufacturer’s instructions, users can obtain accurate resistance readings. This information helps to assess the battery’s condition, determine if it needs to be replaced, and prevent unexpected breakdowns on the road. So, next time you suspect battery issues, remember to utilize a digital analyzer for a reliable and efficient assessment of your car battery’s internal resistance.