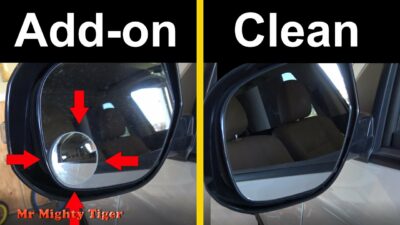
How To Remove A 3m Accessory From A Car Mirror
Are you tired of that outdated 3M accessory cluttering up your car mirror? Fear not, because in this guide, we will walk you through the step-by-step process of removing a 3M accessory from your car mirror. Whether it’s a stubborn decal, a faded parking permit, or an old air freshener holder, we’ve got you covered.
Car mirrors are not only essential for safe driving but also serve as a reflection of our personal style. However, over time, these mirrors can accumulate unwanted accessories that no longer match our taste or serve a purpose. Removing a 3M accessory from a car mirror may seem like a daunting task, but with the right techniques and a little patience, it can be easily accomplished. So, if you’re ready to restore the sleek and clean look of your car mirror, let’s dive into the process and bid farewell to that unwanted 3M accessory once and for all.
How to Remove a 3M Accessory from a Car Mirror:
- Start by gently heating the adhesive using a hairdryer or heat gun on a low setting.
- Once the adhesive is warm, use a thin piece of fishing line or dental floss to carefully slide behind the accessory.
- Gently saw back and forth with the fishing line or dental floss to separate the adhesive from the mirror.
- Continue sliding the line or floss until the entire accessory is removed.
- Finally, clean any residue left on the mirror using a mild solvent and a soft cloth.

How to Remove a 3M Accessory from a Car Mirror
Removing a 3M accessory from your car mirror can be a delicate process, but with the right tools and instructions, it can be done smoothly. In this guide, we’ll walk you through the step-by-step process of removing a 3M accessory from your car mirror to ensure a clean and successful removal.
Step 1: Gather the Necessary Tools
Before you begin, make sure you have the following tools readily available:
- Heat gun or hairdryer
- Rubber gloves
- Plastic scraper or credit card
- Adhesive remover
- Clean cloth or paper towels
Having these tools prepared will help make the removal process easier and safer.
Step 2: Apply Heat to the 3M Accessory
Start by using the heat gun or hairdryer on a low to medium setting to warm up the 3M adhesive. Hold the heat source about 6 inches away from the accessory and move it in a circular motion. This will help soften the adhesive and make it easier to remove.
Be cautious not to overheat the accessory or the mirror, as excessive heat can cause damage. Use the heat source in short intervals and check the temperature regularly to ensure it remains safe.
Step 3: Gently Peel off the Accessory
Once the adhesive has been heated, put on your rubber gloves to protect your hands. Using a plastic scraper or a credit card, gently lift one corner of the accessory and start peeling it off. Apply even pressure and continue peeling slowly to avoid any damage to the mirror or the accessory itself. If you encounter any resistance, apply more heat to soften the adhesive further.
Take your time during this step to ensure a clean removal. Rushing the process may result in leftover adhesive or damage to the mirror’s surface.
Step 4: Remove Residual Adhesive
After removing the accessory, you may notice some residual adhesive left on the mirror. To remove this, apply a small amount of adhesive remover to a clean cloth or paper towel. Gently rub the cloth over the adhesive in a circular motion, applying slight pressure. The adhesive remover will dissolve the remaining adhesive, allowing you to wipe it away easily.
Make sure to clean the entire area thoroughly, removing any traces of adhesive. This will ensure a clean surface for any future applications or modifications.
Step 5: Clean and Inspect the Mirror
Once all the adhesive has been removed, take a clean cloth or paper towel and wipe the mirror to remove any residual adhesive remover. Inspect the mirror for any damages or marks caused during the removal process. If necessary, use a glass cleaner to restore the mirror’s clarity and shine.
By following these steps, you should be able to remove a 3M accessory from your car mirror safely and effectively. Remember to take your time, use the proper tools, and exercise caution throughout the process for the best results.
Faqs for How To Remove A 3m Accessory From A Car Mirror:
Removing a 3M accessory from your car mirror is a fairly straightforward process. First, start by carefully inspecting the accessory to locate any adhesive or mounting points. Depending on the type of accessory, you may find adhesive pads, adhesive strips, or screws holding it in place.
If there are adhesive pads or strips, gently peel them off starting from one corner. Apply steady and even pressure to avoid damaging the mirror or the accessory. If there are screws, use the appropriate screwdriver to unscrew and remove them. Once the adhesive or screws are removed, the accessory should easily come off the mirror.
It depends on the type of 3M accessory and its condition after removal. Some accessories, like adhesive pads or strips, may lose their adhesive properties and should not be reused. However, if the accessory is still in good condition and has a strong adhesive backing, it may be possible to reuse it.
Before attempting to reuse the accessory, thoroughly clean both the mirror and the accessory to ensure proper adhesion. If the accessory does not stick securely, it is recommended to replace it with a new one to avoid any potential safety hazards while driving.
After removing a 3M accessory from your car mirror, it’s important to clean any residue left behind. To clean the mirror, use a mild glass cleaner or a mixture of water and vinegar. Spray the cleaner onto a soft, lint-free cloth and gently wipe the mirror surface.
Avoid using abrasive cleaners or harsh chemicals, as they can damage the mirror’s coating. It’s also important to avoid spraying the cleaner directly onto the mirror to prevent any liquid from seeping into the mirror housing or electronics.
When removed properly, a 3M accessory should not leave any marks or damage on your car mirror. However, this may depend on the type of accessory and how it was installed. Adhesive pads or strips, if not removed carefully, may leave some residue on the mirror surface.
To minimize the risk of marks or damage, follow the removal instructions provided by 3M for the specific accessory you are removing. Take your time and use gentle pressure to avoid scratching or cracking the mirror. If you are unsure about the removal process, it’s always recommended to seek professional assistance.
While removing a 3M accessory from your car mirror is generally safe, it’s important to take some precautions to prevent any accidents or injuries. First, make sure your car is parked in a safe location and the engine is turned off. This will help avoid any distractions or potential hazards while working.
Wear gloves to protect your hands from any sharp edges or adhesive residues. If the accessory requires the use of tools, handle them with care and follow the manufacturer’s instructions. If you encounter any difficulties during the removal process, consider seeking professional help to ensure a safe and proper removal.
conclusion:
removing a 3M accessory from a car mirror may seem like a daunting task, but with the right tools and techniques, it can be done effectively and efficiently. By following the step-by-step instructions provided in this guide, you can safely and successfully remove the 3M accessory without causing any damage to your car’s mirror or the surrounding area.
Remember, patience is key when undertaking this task. Take your time and proceed with caution to ensure a smooth removal process. And don’t forget to clean the surface thoroughly afterward to remove any residue left behind. By taking these steps, you can restore your car mirror to its original condition and enjoy a clear and unobstructed view while driving. So, why wait? Get started today and say goodbye to that unwanted 3M accessory on your car mirror!