How to Test Amplifier Speaker Output with a Multimeter
Today we discuss How to Test Amplifier Speaker Output with a Multimeter. Well, you’ve come to the right place! In this article, we will show you a simple step-by-step method to check the speaker output of your amplifier using a multimeter. It’s a practical solution that allows you to ensure your speakers are functioning optimally without any complicated processes or expensive tools. So let’s dive straight into the process of testing amplifier speaker output with a multimeter and get your audio system up and running smoothly.

How to Test Amplifier Speaker Output with a Multimeter:
Testing the speaker output of an amplifier is an essential step to ensure optimal audio performance. By using a multimeter, you can measure crucial parameters such as voltage, impedance, and continuity. This guide will walk you through the process, providing step-by-step instructions and valuable tips to help you accurately test the amplifier speaker output with a multimeter.
Understanding Amplifier Speaker Output:
Before diving into the testing process, it’s crucial to have a clear understanding of amplifier speaker output. Here are some key points to consider:
A. Speaker Output Voltage
The speaker output voltage refers to the electrical signal sent from the amplifier to the speaker. It is measured in volts (V) and plays a vital role in determining the audio quality and volume produced by the speaker.
B. Speaker Output Impedance
The speaker output impedance represents the resistance offered by the speaker to the electrical signal. It is crucial to match the impedance of the amplifier with that of the speaker to avoid potential damage and distortion.
Tools Needed:
Before you begin testing, make sure you have the following tools:
A. Multimeter
A multimeter is the primary tool required for testing the amplifier’s speaker output. It is a versatile device that can measure voltage, resistance, and continuity.
B. Test Leads
Test leads or probes are essential accessories that connect the multimeter to the amplifier and speaker. Ensure that the test leads are in good condition to obtain accurate readings.
C. Speaker Cables
You’ll need speaker cables to connect the amplifier to the speaker securely. Make sure the cables are in good condition and properly connected.
Safety Precautions:
Whenever working with audio equipment, it’s crucial to prioritize safety. Follow these precautions:
A. Power Off
Before connecting or disconnecting any cables, ensure that the amplifier and other audio devices are powered off to avoid electric shock or damage.
B. Discharge Capacitors
Amplifiers can contain large capacitors that store electrical charge even when powered off. To avoid any risk, take the necessary steps to discharge the capacitors before testing.
C. Proper Grounding
Ensure that your work area has proper grounding to minimize the risk of electric shocks. Use rubber mats or wear rubber-soled shoes if necessary.
D. Use Insulated Tools
When handling any equipment or connections, use insulated tools to avoid the possibility of electrical shorts or accidents.
Section 4: Setting Up the Multimeter
To test the amplifier speaker output accurately, you’ll need to configure the multimeter properly. Follow these steps:
A. Select AC Voltage Mode
Set the multimeter to measure AC voltage. This setting allows you to measure the alternating current used in audio signals.
B. Choose a Suitable Voltage Range
Select an appropriate voltage range on the multimeter to ensure accurate readings. Start with a higher range and switch to a lower range if the reading exceeds the initial range.
C. Connect the Test Leads
Connect the test leads to the multimeter following the manufacturer’s instructions. Usually, the red lead goes into the VΩmA port, and the black lead goes into the COM port.
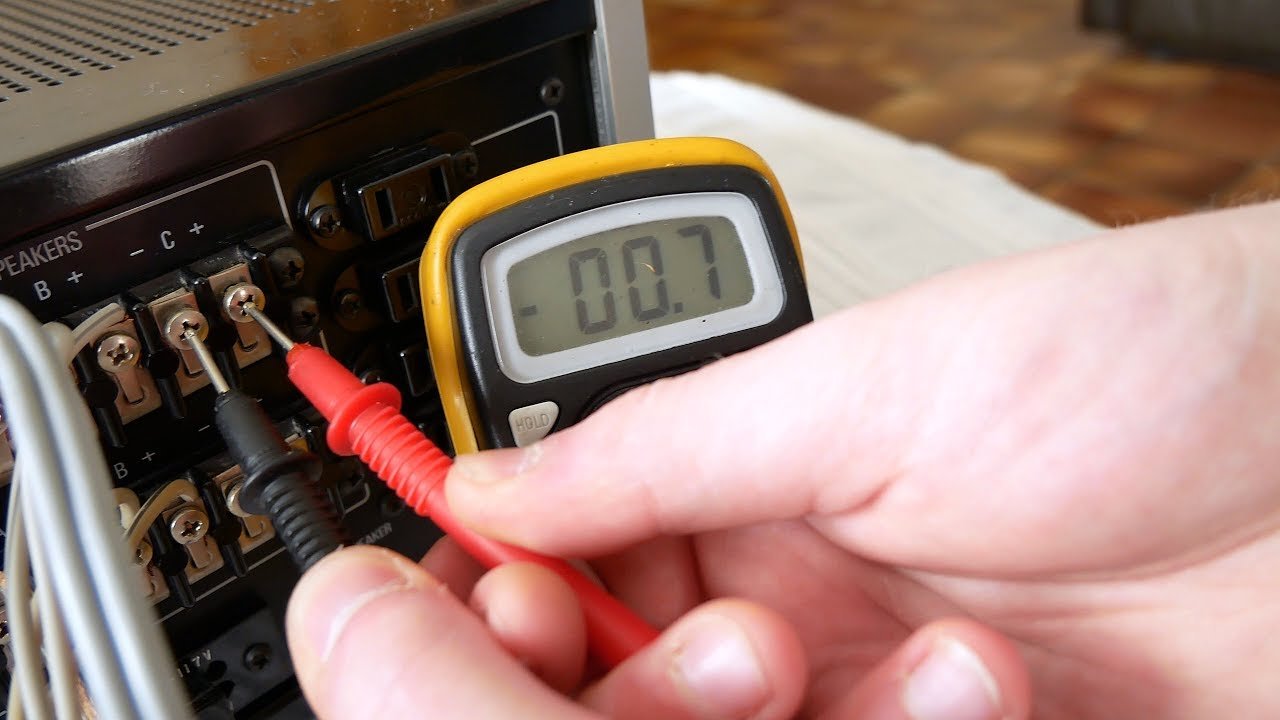
Testing Speaker Output Voltage
Now that you have the multimeter set up, it’s time to test the speaker output voltage. Follow these steps:
A. Disconnect the Speaker
Disconnect the speaker cables from the amplifier’s speaker output terminals. This step ensures that you measure the voltage accurately without any interference from the connected speakers.
B. Connect the Multimeter
Connect the black test lead to the common (COM) terminal of the amplifier’s speaker output and the red test lead to the positive (+) terminal.
C. Power On the Amplifier
Turn on the amplifier while keeping the volume level low to avoid any sudden loud noises or potential damage to the speakers or ears.
D. Measure the Voltage
Place the multimeter’s selector switch in the AC voltage mode. Carefully read the voltage value displayed on the multimeter’s screen.
E. Compare the Voltage
Compare the measured voltage with the amplifier’s specifications or the expected voltage range for your setup. If the voltage falls within the expected range, your amplifier’s speaker output is functioning correctly.
Testing Speaker Output Impedance:
Determining the speaker output impedance is vital to ensure the compatibility between the amplifier and the speaker. Follow these steps to test the speaker output impedance:
A. Disconnect the Amplifier
Disconnect the amplifier from the power source to avoid any electrical mishaps during the testing process.
B. Set the Multimeter to Resistance Mode
Switch the multimeter to the resistance (Ω) mode. This mode allows you to measure the impedance of the speaker output.
C. Connect the Multimeter
Connect the black test lead to the common (COM) terminal of the multimeter and the red test lead to the positive (+) terminal.
D. Measure the Impedance
Touch the test leads to the amplifier’s speaker output terminals. Note the resistance value displayed on the multimeter’s screen.
E. Compare the Impedance
Compare the measured speaker output impedance with the specifications provided by the amplifier manufacturer. Ensure that the impedance matches the recommended range for your speaker.
Testing Speaker Output Continuity:
Checking the continuity of the speaker output helps identify any potential wiring issues or loose connections. Follow these steps to test the speaker output continuity:
A. Disconnect the Amplifier
As a safety measure, disconnect the amplifier from the power source before proceeding with continuity testing.
B. Switch to Continuity Mode
Set the multimeter to the continuity mode. This mode emits a beep or displays a value when a complete circuit is detected.
C. Connect the Multimeter
Connect the black test lead to the common (COM) terminal and the red test lead to the positive (+) terminal of the multimeter.
D. Touch the Test Leads
Touch the test leads to the corresponding positive and negative terminals of the amplifier’s speaker output. Listen for the continuity beep or check the multimeter’s screen to confirm continuity.
E. Inspect the Connections
In case of any issues with continuity, carefully inspect the speaker cables, connectors, and amplifier terminals for loose connections or damage. Rectify any problems before retesting.
Troubleshooting Tips:
If you encounter any issues during the testing process, here are some troubleshooting tips to help you resolve common problems:
A. Check the Power Source
Ensure that the amplifier is receiving power from a reliable source. Verify the power outlet, power cord, and any associated switches or fuses.
B. Examine the Speaker Cables
Inspect the speaker cables for any visible damage or loose connections. Replace or repair any faulty cables.
C. Verify Speaker Configuration
Confirm that the speakers are connected correctly and in the appropriate configuration (e.g., stereo, mono, parallel, or series).
D. Consult the Amplifier Manual
Refer to the amplifier’s user manual for specific troubleshooting steps and potential issues related to the speaker output.
How to test and measure your amplifier outputs – avoid blowing up speakers
Frequently Asked Questions
Can I test amplifier speaker output with a multimeter?
Yes, you can test the amplifier speaker output using a multimeter. It can help you determine if the amplifier is functioning properly and if there are any issues with the speaker’s output.
What settings should I use on my multimeter to test amplifier speaker output?
To test the speaker output, set your multimeter to the AC voltage mode. Make sure the range is suitable for measuring the expected output voltage, usually 20V or higher.
How do I connect the multimeter to the amplifier speaker output?
Connect the black probe (negative) of your multimeter to the negative speaker terminal of the amplifier. Similarly, connect the red probe (positive) to the positive speaker terminal.
What are the typical voltage readings for the amplifier speaker output?
The voltage readings can vary depending on the amplifier and the volume level. Ideally, the output voltage should match the specifications provided by the amplifier manufacturer. It is recommended to consult the amplifier’s user manual for specific voltage requirements.
What should I do if the voltage readings are too low or nonexistent?
If the voltage readings are significantly lower than expected or close to zero, there might be an issue with the amplifier, speaker wiring, or the speaker itself. Check the connections, cables, and speaker integrity for any faults or loose connections. If the problem persists, it might be necessary to consult a professional for further troubleshooting and repair.
Is it possible to damage the multimeter when testing amplifier speaker output?
It is unlikely to damage the multimeter when testing the amplifier speaker output if the correct settings and precautions are followed. However, it is important to avoid testing high-power signals or exceeding the multimeter’s voltage range, as this could potentially damage the device. Always ensure the multimeter is compatible with the expected voltage levels before conducting any measurements.
Can I test the speaker output without disconnecting it from the amplifier?
Yes, it is possible to test the speaker output without disconnecting it from the amplifier. However, keep in mind that connecting the multimeter in parallel with the speaker might slightly affect the audio signal. If you prefer a more accurate measurement, it is recommended to disconnect the speaker temporarily and directly test the amplifier’s output.
Final Thoughts
In conclusion, testing the output of an amplifier speaker with a multimeter is a straightforward process that can provide valuable insights into the performance of your sound system. By following the steps outlined in this article, you can effectively measure the voltage and impedance of the speaker output, ensuring that it is within the desired range for optimal audio reproduction. Remember to always exercise caution when working with electrical equipment and refer to the manufacturer’s instructions for specific guidance. By utilizing a multimeter for testing, you can ensure the proper functioning of your amplifier speaker setup.