Testing A Car Battery With A Multimeter: A Comprehensive Guide
Looking to test your car battery’s health? Wondering how to test a car battery with a multimeter? Well, you’ve come to the right place. In this article, we will guide you through the simple steps to determine the condition of your car battery using a multimeter. With just a few tools and a bit of patience, you’ll be able to assess whether your battery is holding a charge or if it’s time for a replacement. So, let’s get started on learning this valuable skill that every car owner should have.

How to Test a Car Battery with a Multimeter?
Section 1: Introduction to Testing Car Batteries with a Multimeter
Testing your car battery regularly is essential to ensure its proper functioning and avoid unexpected breakdowns. A multimeter is a versatile tool that can be used to test various electrical components, including car batteries. In this guide, we will walk you through the step-by-step process of testing a car battery using a multimeter. By following these instructions, you can gain valuable insights into your battery’s health and determine if it requires maintenance or replacement.
Section 2: Understanding the Basics of a Car Battery
Before diving into the testing process, it’s important to have a basic understanding of how a car battery works. A car battery is a rechargeable device that supplies electrical energy to the vehicle’s electrical system. It consists of multiple cells connected in series, typically producing 12 volts. The battery’s primary function is to provide the necessary power to start the engine and run electrical accessories when the engine is not running.
Subsection 2.1: Components of a Car Battery
A car battery comprises several components that work together to provide electrical power. Understanding these components will help you interpret the results of your battery test accurately. The key components of a car battery include:
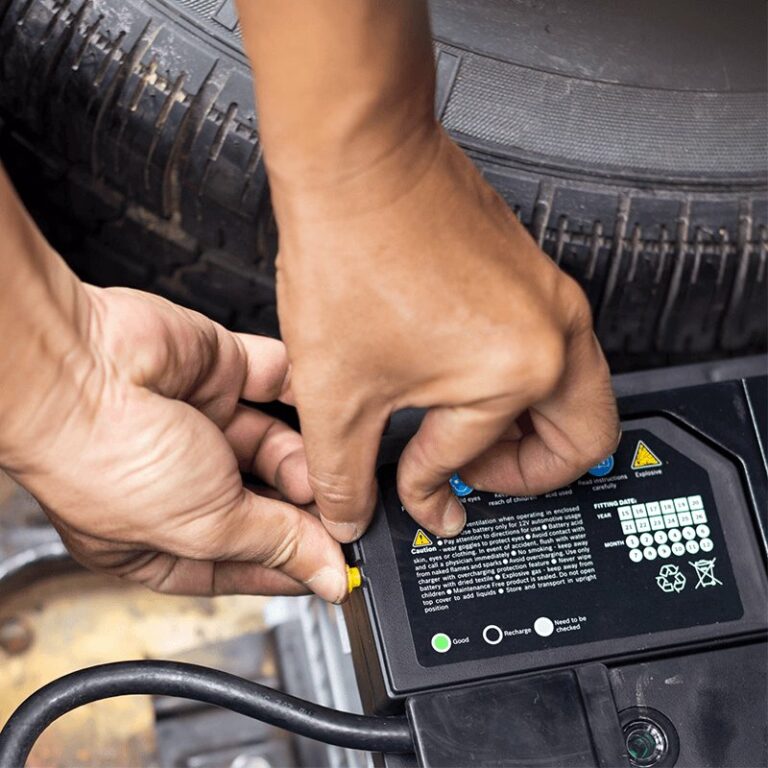
– Positive and Negative Terminals: The battery’s positive and negative terminals, usually marked with (+) and (-) signs, respectively, provide the connection points for electrical cables.
– Electrolyte: Car batteries are typically filled with a mixture of sulfuric acid and distilled water, known as electrolyte. This electrolyte facilitates a chemical reaction that generates electrical energy.
– Battery Case: The battery case serves as a protective housing for the internal components. It is usually made of durable plastic or rubber material, ensuring the safety of the battery and its surroundings.
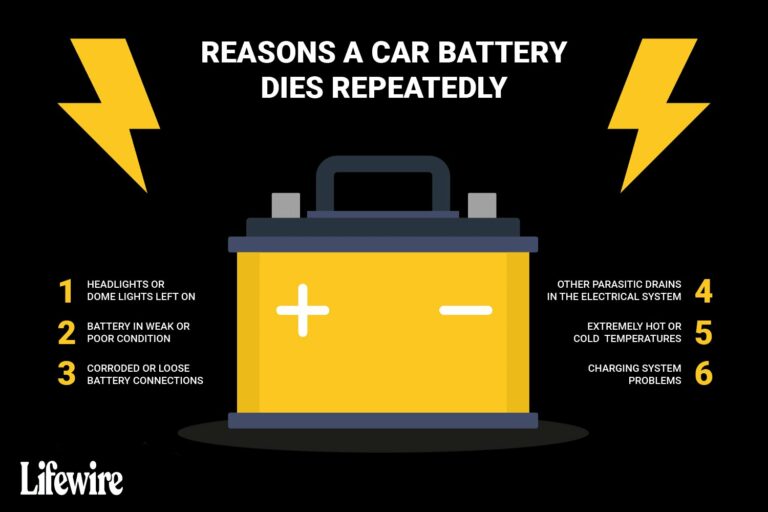
Section 3: When to Test Your Car Battery
Regular battery testing is crucial to ensure optimal performance and avoid unexpected failures. Here are some scenarios when you should consider testing your car battery:
– If your vehicle is experiencing starting difficulties: If you notice that your engine cranks slowly or struggles to start, it may indicate a weak battery. Testing the battery can help identify the root cause of the problem.
– Before embarking on a long trip: Long journeys can put additional strain on your car’s electrical system. Testing the battery before such trips will give you peace of mind and reduce the risk of being stranded unexpectedly.
– After a long period of inactivity: If your car has been sitting idle for an extended period, the battery may have discharged. Testing it will help determine if it needs recharging or replacement.
Section 4: Tools Required for Testing a Car Battery with a Multimeter
Before proceeding with the testing process, make sure you have the following tools on hand:
– Multimeter: A multimeter is an electronic device that can measure voltage, current, and resistance. For testing a car battery, you will need a multimeter capable of measuring DC voltage within the automotive battery range (typically 12 volts).
– Safety Equipment: It’s always important to prioritize safety when working with batteries. Wear protective gloves and safety goggles to prevent any potential accidents or injuries.
Section 5: Step-by-Step Guide to Testing a Car Battery
Now that you are familiar with the basics, let’s dive into the step-by-step process of testing a car battery using a multimeter. Follow these instructions carefully to obtain accurate results:
Subsection 5.1: Precautions Before Testing
Before proceeding with the testing process, ensure that you take the necessary precautions:
– Park the vehicle in a well-ventilated area: Testing a battery can release potentially hazardous gases. Performing the test in a well-ventilated space reduces the risk of exposure to these gases.
– Turn off the ignition and all electrical accessories: Ensure that the engine is turned off, and all electrical components, such as lights and radios, are switched off. This step prevents any interference during the test.
Subsection 5.2: Testing the Battery Voltage
To test the voltage of your car battery using a multimeter, follow these steps:
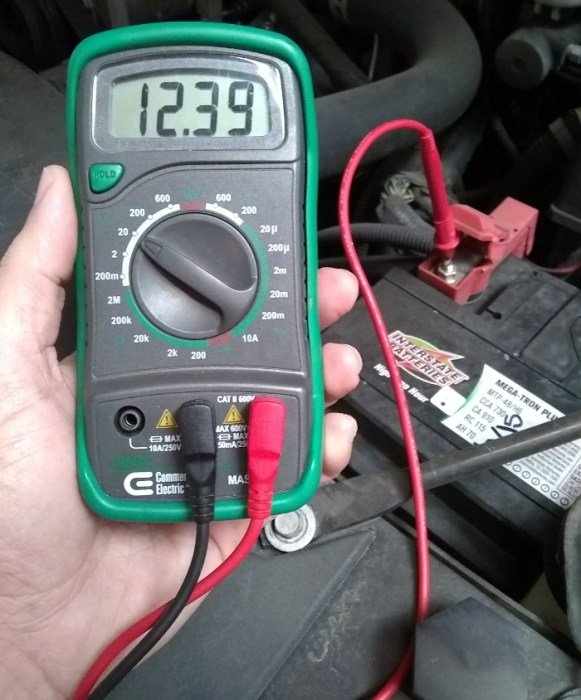
1. Set the multimeter to DC voltage: Turn on your multimeter and set it to the DC voltage mode. Select a range that is appropriate for automotive batteries, usually around 12 volts.
2. Connect the multimeter probes: Identify the positive and negative terminals of your battery. Connect the red probe to the positive terminal (+) and the black probe to the negative terminal (-).
3. Read the voltage: Once the probes are securely connected, read the voltage displayed on the multimeter. A healthy battery typically shows a voltage reading between 12.4 to 12.7 volts. If the reading is significantly lower, it may indicate a weak or discharged battery.
Subsection 5.3: Conducting a Load Test
In addition to measuring the battery voltage, conducting a load test provides a comprehensive assessment of your battery’s condition. A load test simulates the actual load experienced by the battery when starting the engine. Follow these steps to conduct a load test:
1. Prepare the load tester: Set up the load tester according to the manufacturer’s instructions. Ensure that it is configured to test the appropriate voltage range for your car battery.
2. Connect the load tester: Connect the load tester’s positive and negative leads to the corresponding terminals on your battery, just as you would with the multimeter probes.
3. Apply the load: Activate the load tester and observe the readings. The load test should simulate the starting load on the battery. Check if the battery voltage drops significantly during the load test. A healthy battery should maintain its voltage within an acceptable range.
Section 6: Interpreting the Test Results
Once you have completed the battery test, it’s important to interpret the results correctly. Here’s how you can make sense of the readings:
– Voltage Test: If your battery voltage falls below the recommended range (12.4 to 12.7 volts), it is likely weak or discharged. Consider recharging or replacing the battery, depending on the specific situation.
– Load Test: During a load test, if the battery’s voltage drops dramatically, it indicates a weakened battery. In such cases, it is advisable to replace the battery as it may not provide sufficient power to start the engine reliably.
Section 7: Maintaining and Caring for Your Car Battery
Proper maintenance and care can significantly extend the lifespan of your car battery. Here are some essential tips to keep your battery in top condition:
– Keep the battery terminals clean: Regularly inspect the battery terminals and remove any corrosion using a battery terminal cleaner. Corrosion can hinder the flow of electrical current and affect battery performance.
– Secure the battery: Ensure that the battery is securely fastened in its mounting bracket to prevent excessive vibration, which can damage the battery and its connections.
– Avoid deep discharges: Repeatedly discharging your battery to a low level can shorten its overall lifespan. If possible, avoid deep discharges by minimizing power-consuming accessories when the engine is not running.
Section 8: Conclusion
Testing your car battery with a multimeter is a straightforward process that can provide valuable insights into its health and performance. By following the step-by-step instructions outlined in this guide, you can diagnose battery issues early on and take appropriate measures to prevent unexpected breakdowns. Remember to exercise caution while working with batteries and prioritize safety at all times. Regular maintenance and care will ensure that your car battery serves you reliably for years to come.
How to Test a Car Battery with a Multimeter
Frequently Asked Questions
How can I test a car battery using a multimeter?
To test a car battery using a multimeter, follow these steps:
1. Set the multimeter to the DC voltage setting.
2. Connect the multimeter’s positive probe (red) to the battery’s positive terminal.
3. Connect the multimeter’s negative probe (black) to the battery’s negative terminal.
4. Read the voltage displayed on the multimeter.
5. A fully charged battery should read around 12.6 volts or higher.
6. If the voltage is significantly lower, the battery may be discharged or faulty.
7. If the voltage drops rapidly while performing a load test, it may indicate a weak battery.
Remember to wear protective gloves and goggles while handling car batteries.
Can a multimeter check the overall health of a car battery?
No, a multimeter can only indicate the voltage level of a car battery. It cannot assess the overall health or its ability to hold a charge. To determine the battery’s health, it is recommended to perform additional tests such as a load test, which measures the battery’s performance under load conditions, or using a battery tester that provides more comprehensive information.
What does it mean if the multimeter reading on the car battery shows a voltage below 12 volts?
If the multimeter reading on the car battery shows a voltage below 12 volts, it indicates that the battery is likely discharged or needs charging. A fully charged battery typically reads around 12.6 volts. It is advisable to recharge the battery and retest it. If the voltage remains low after charging, it may indicate a faulty battery that needs replacement.
Is it necessary to disconnect the car battery before testing it with a multimeter?
It is not necessary to disconnect the car battery when testing it with a multimeter. However, it is important to exercise caution and avoid shorting the battery by ensuring that the probes do not touch each other or any metal surface. Always follow safety guidelines, wear protective gear, and exercise care while working with car batteries.
Can I test a car battery while the engine is running?
It is not recommended to test a car battery with a multimeter while the engine is running. The alternator of the vehicle may be providing a charge, which can affect the accuracy of the test results. It is best to turn off the engine and let the battery rest for some time before testing its voltage with a multimeter.
What should I do if the multimeter reading on the car battery fluctuates?
If the multimeter reading on the car battery fluctuates, it may indicate an unstable battery or connection. Ensure that the battery terminals are clean and securely connected. If the fluctuations persist, it is advisable to have the battery and charging system inspected by a professional to diagnose and resolve any issues.
Can a multimeter be used to test the car battery’s capacity?
No, a multimeter cannot be used to determine the capacity or amp-hour rating of a car battery. Capacities are measured using specialized equipment that applies a controlled load to the battery and measures its performance over a specific period. If you need to know the battery’s capacity, consult the manufacturer’s specifications or have it tested by a professional battery testing service.
Final Thoughts
To conclude, testing a car battery with a multimeter is a straightforward process that can help identify potential issues and ensure the battery’s functionality. By following the steps mentioned in this article, such as setting the multimeter to the appropriate voltage range, connecting the probes correctly, and interpreting the readings, car owners can effectively assess their battery’s condition. Regularly performing this test is crucial for maintaining a reliable and efficient vehicle. So, if you ever encounter battery-related problems, don’t hesitate to use a multimeter to determine if a battery replacement or further inspection is needed. Remember, knowing how to test a car battery with a multimeter is essential for every car owner’s maintenance routine.