How To Check Speaker Wires In A Car
Today we discuss How To Check Speaker Wires In A Car. However, over time, these wires can become damaged or loose, leading to frustrating audio issues. If you’re ready to take matters into your own hands and diagnose the problem, this guide will walk you through the step-by-step process of checking speaker wires in your car. By the end of this article, you’ll have the knowledge and confidence to troubleshoot and resolve any issues, helping you regain that crystal-clear sound you’ve been longing for.
Before diving into the process, it’s important to understand the importance of speaker wires and how they impact your overall audio quality. A damaged or improperly connected wire can lead to weak or distorted sound, a lack of bass, or even complete audio failure.
This can be incredibly frustrating, especially for those who appreciate a high-fidelity sound experience while driving. By learning how to check the speaker wires in your car, you’ll be equipped with the skills to identify and address any wiring issues, saving you time and money on unnecessary repairs.
Feature:
- Start by turning off the car’s power and removing the stereo unit.
- Locate the speaker wires connected to the stereo unit.
- Use a multimeter to test the continuity of the wires.
- Set the multimeter to the resistance mode and touch the probes to the wire ends.
- If the multimeter shows a reading close to zero, the wire is intact.
- If there is no reading or a high resistance, the wire may be damaged and needs to be replaced.
- Repeat the process for all speaker wires.

How to Check Speaker Wires in a Car:
If you are experiencing issues with the audio quality in your car, it could be due to faulty speaker wires. Checking the speaker wires is a simple process that can help you identify and resolve any wiring problems. By following these step-by-step instructions, you will be able to determine if the speaker wires in your car are functioning properly.
Step 1: Prepare the Tools
Before you begin, gather the necessary tools for this task. You will need a multimeter, which is a device used to measure electrical current, voltage, and resistance. Additionally, ensure that you have a set of wire cutters and strippers, as well as electrical tape for any repairs.
Step 2: Disconnect the Power
Prior to inspecting the speaker wires, it is important to disconnect the power source from your car’s audio system. This can be done by either turning off the car’s engine or disconnecting the battery. By doing so, you can avoid any potential electrical hazards during the process.
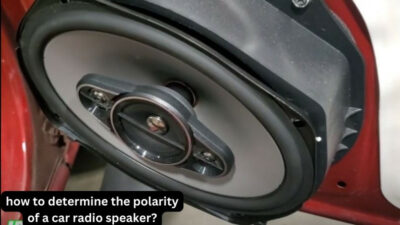
Step 3: Locate the Speaker Wires
Identify the location of the speaker wires in your car. In most cases, the wires are routed through the door panels or the dashboard. Consult your car’s manual or do some research online to determine the specific location of the speaker wires in your vehicle.
Step 4: Inspect the Wires
Once you have located the speaker wires, carefully examine them for any signs of damage or wear. Look for cuts, fraying, or exposed wires that may indicate a problem. Additionally, check for loose connections or disconnected wires that may need to be reattached.
Step 5: Test the Wires with a Multimeter
Using the multimeter, set it to the resistance mode. Touch the multimeter’s probes to the positive and negative terminals of the speaker wires. The multimeter should display a reading close to zero ohms, indicating a good connection. If the reading is significantly higher or shows an open circuit, it suggests a problem with the speaker wires.
Step 6: Repair or Replace the Wires
If you have identified any issues with the speaker wires, it is essential to repair or replace them. For minor damage, such as cuts or fraying, you can use wire cutters to remove the damaged portion and strip the wire ends. Then, reconnect the wires using wire connectors or electrical tape. In cases of severe damage or loose connections, it may be necessary to replace the entire length of the speaker wire.
Step 7: Reconnect the Power and Test
After completing the necessary repairs or replacements, reconnect the power source to your car’s audio system. Turn on the engine or reconnect the battery and test the audio quality. If the sound is clear and without any issues, it indicates that the speaker wires are now functioning properly.
Step 8: Perform a Final Check
Before concluding the process, it is recommended to perform a final check of all the speaker wires. Ensure that the connections are secure, the wires are properly insulated, and there are no signs of damage. This will help prevent any future audio problems and ensure a long-lasting solution.
Step 9: Regular Maintenance
To maintain optimal audio performance in your car, it is advised to regularly inspect the speaker wires for any signs of wear or damage. Conducting routine checks can help identify issues early on and prevent any major audio disruptions.
Step 10: Seek Professional Help if Needed
If you are unsure about checking or repairing the speaker wires yourself, it is always best to seek assistance from a professional car audio technician. They have the expertise and knowledge to diagnose and resolve any complex wiring issues, ensuring the best possible audio experience in your car.
Faqs for How To Check Speaker Wires In A Car:
To check if your car speaker wires are working, you can follow these steps:
First, turn on your car stereo and set the volume to a reasonable level. Then, locate the speaker wires at the back of your car’s stereo unit. These wires are usually color-coded, with each wire corresponding to a specific speaker (front left, front right, rear left, rear right).
Next, use a multimeter to test the continuity of each speaker wire. Set the multimeter to the resistance (ohms) measurement mode and touch the probes to the positive and negative terminals of each wire. If the multimeter shows a resistance reading close to the speaker’s impedance rating (usually 4 or 8 ohms), it means the wire is working fine. Repeat this process for all the speaker wires.
If you find a faulty speaker wire during your testing, there are a few steps you can take to fix the issue:
First, identify the exact location of the fault in the wire. Check for any visible signs of damage, such as cuts, fraying, or loose connections.
If you find any of these issues, you will need to repair or replace the wire.
If the wire appears to be intact but still not working, you can try swapping the wire with another working wire from a different speaker. This will help you determine if the problem lies with the wire or the speaker itself. If the swapped wire works, then you will need to replace the original faulty wire.
Yes, you can test speaker wires without a multimeter, although it may not be as accurate. One method is to use a 9-volt battery. Simply disconnect the speaker wire from the stereo unit and touch the positive and negative terminals of the wire to the positive and negative terminals of the battery. If the speaker wire is working, you should hear a faint crackling sound from the speaker. Repeat this process for all the speaker wires.
However, it is important to note that this method only tests for basic functionality and may not detect more subtle issues with the speaker wires. For a more comprehensive test, using a multimeter is recommended.
There are a few signs that may indicate faulty speaker wires in a car:
– No sound: If you are not hearing any sound or if the sound is distorted or intermittent, it could be a sign of faulty speaker wires.
– Speaker cutting out: If a speaker cuts out or stops working when you hit a bump or turn a corner, it could indicate a loose or damaged wire connection.
– Poor sound quality: If the sound from your speakers is muffled, distorted, or lacking clarity, it may be due to faulty speaker wires.
If you are unsure about checking your car speaker wires or if you are not comfortable working with electrical components, it is recommended to consult a professional.
They have the necessary tools, knowledge, and expertise to diagnose and fix any issues with your car’s speaker wires. A professional can ensure the job is done correctly and minimize the risk of causing further damage to your vehicle’s audio system.
Remember, it is always better to be safe than sorry when it comes to working with electrical components in your car.

Source: pexels.com
Conclusion:
ensuring that the speaker wires in your car are properly functioning is crucial for an optimal audio experience. By following the step-by-step process outlined in this guide, you can confidently check your speaker wires and identify any issues that may be affecting the sound quality of your car. Remember to take your time, use the proper tools, and consult your car’s manual if needed. With a little patience and diligence, you can enjoy crystal-clear audio and make the most out of your driving experience.
Don’t let faulty speaker wires dampen your enjoyment on the road. By regularly checking and maintaining your car’s speaker wires, you can prevent any potential audio disruptions and ensure a high-quality sound system. Whether you are a music enthusiast or simply enjoy having clear communication while driving, taking the time to inspect your speaker wires is well worth the effort. So, grab your tools, follow the steps outlined in this guide, and embark on a journey of improved audio performance in your car. Happy listening!